チュートリアルに関する記事の7本目です。
参考サイト: Flask – Tutorial(公式ドキュメント)
- チュートリアル
- クイックスタート
9. テストカバレッジ
アプリケーションのユニットテストを書くことで、記述したコードが期待通り動くかチェックすることができます。Flaskは、アプリケーションにリクエストし、レスポンスデータを返すシミュレーションを行うテストクライアントを提供しています。
開発者は、可能な限り多くのコードをテストすべきです。関数のコードはその関数が呼びだされたときだけ実行され、ifブロックのような分岐ブロック内のコードは条件が適合したときにだけ実行されます。開発者は、それぞれの関数が各分岐ブロックをカバーするデータを使って、テストされることを確かたいと思うでしょう。
網羅率が100%に近くなればなるほど、変更によって予期せぬ振る舞いが引き起こされるわけではないと安心できるようになります。しかし、100%網羅することはコードの中にバグが含まれないということを保証するわけではありません。特にユーザがブラウザ上でどのようにアプリケーションを扱うかまではテストできません。限界はありますが、、テストカバレッジは開発の際に利用するとても大事なツールです。
<注記>
これはこのチュートリアルに最近、挿入されたばかりの項目です。しかし将来的には常に把握されるべき内容です。
コードを評価し、テストするためにPytestとcogerageをインストールする必要があります。
(env)flask-tutorial$ pip install pytest coverage9-1. セットアップとfixture
テストコードはtestsディレクトリの中に置かれます。このディレクトリはflaskrディレクトリの中ではなく、並置されます。tests/conftest.pyファイルは、各テストが利用するfixtureと呼ばれるセットアップ関数を含みます。テストファイルは、test_で始まるPythonモジュールで、モジュール内の各関数もtest_で始まる名前をつけます。
各テストは、新たな一時格納データベースを作り、テストで使うデータを保存します。このデータを挿入するためのSQLクエリが書かれたファイルが下記になります。
# tests/data.sql

INSERT INTO user (username, password)
VALUES
  ('test', 'pbkdf2:sha256:50000$TCI4GzcX$0de171a4f4dac32e3364c7ddc7c14f3e2fa61f2d17574483f7ffbb431b4acb2f'),
  ('other', 'pbkdf2:sha256:50000$kJPKsz6N$d2d4784f1b030a9761f5ccaeeaca413f27f2ecb76d6168407af962ddce849f79');

INSERT INTO post (title, body, author_id, created)
VALUES
('test title', 'test' || x'0a' || 'body', 1, '2018-01-01 00:00:00');appfixtureは、ローカルの開発環境を使用する代わりに、アプリケーションとデータベースのテスト用の環境を構築するため、ファクトリーを呼び出し、test_configにパスを通します。
# tests/conftest.py

import os
import tempfile

import pytest
from flaskr import create_app
from flaskr.db import get_db, init_db

with open(os.path.join(os.path.dirname(__file__), 'data.sql'), 'rb') as f:
    _data_sql = f.read().decode('utf8')


@pytest.fixture
def app():                                         # app fixture
    db_fd, db_path = tempfile.mkstemp()            # 仮ファイルを作成・開き、データが挿入され、パスが上書きされる。

    app = create_app({
        'TESTING': True,                           # テスト中であることの宣言
        'DATABASE': db_path,
    })

    with app.app_context():
        init_db()
        get_db().executescript(_data_sql)

    yield app

    os.close(db_fd)
    os.unlink(db_path)


@pytest.fixture
def client(app):                                   # client fixture
    return app.test_client()


@pytest.fixture
def runner(app):                                   # runner fixture
return app.test_cli_runner()tempfile.mkstemp()は、一時的な仮ファイルを作成し、そのファイルを開き、ファイルオブジェクトとそのパスを返します。DATABASEパスは上書きされるため、instanceフォルダの代わりにこの仮ファイルへのパスに変更されます。パスをセットした後、データベーステーブルが作成され、テストデータが挿入されます。テストが完了したのち、この仮ファイルは閉じられ、削除されます。
TESTINGは、Flaskにこのアプリが現在テスト中であることを伝えます。Flaskはこれにより内部の挙動をいくつか変更し、テストに好ましい状況になります。他の拡張機能には、テストをより簡単にするためにこの引数を利用するものもあります。
clientfixtureは、appfixtureで作られたアプリケーションオブジェクトとともにapp.test_client()を呼び出します。テストの中で、サーバを起動せずにアプリケーションにリクエストを送るため、このclientfixtureを使います。
runnerfixtureはclientに似ています。app.test_cli_runner()はアプリケーションに登録されたクリックコマンドを呼び出せるランナーを生成します。
Pytestはfixtureの関数の名前とテスト関数内の引数の名前を照合することによってfixtureを使用します。例えば、後で記述するtest_hello関数は、client引数をとります。Pytestはそれをclientfixture関数と照合し、そのfixture関数を呼び出して、戻り値をテスト関数に返します。
9-2. ファクトリー
ファクトリー自体をテストする方法はあまり多くはありません。たいていのテストは既にあるコード向けに実装されているため、何か誤りがあればその他のテストで気付くことができます。
変更を加え、テストを行う唯一の方法はテストの設定を変えることです。設定ファイルが渡されない場合、デフォルトの設定が利用されますが、それもない場合何かしらの設定をする必要があります。
# tests/test_factory.py

from flaskr import create_app


def test_config():
    assert not create_app().testing
    assert create_app({'TESTING': True}).testing


def test_hello(client):
    response = client.get('/hello')
assert response.data == b'Hello, World!'チュートリアルのはじめにアプリケーションファクトリーを書いた際、一例としてhelloルートを加えました。これは”Hello World!”を返しますが、このテストではレスポンスデータがその戻り値とマッチするかチェックしています。
9-3. データベース
アプリケーションコンテキストの中でget_dbは呼び出されるたびに同じコネクションを返す必要があり、コンテキスト後、そのコネクションは閉じられる必要があります。
# tests/test_db.py

import sqlite3

import pytest
from flaskr.db import get_db


def test_get_close_db(app):
    with app.app_context():
        db = get_db()
        assert db is get_db()

    with pytest.raises(sqlite3.ProgrammingError) as e:
        db.execute('SELECT 1')

assert 'closed' in str(e.value)init-dbコマンドは、init_db関数を呼び出し、メッセージを表示します。
#tests/test_db.py
def test_init_db_command(runner, monkeypatch):
    class Recorder(object):
        called = False

    def fake_init_db():
        Recorder.called = True

    monkeypatch.setattr('flaskr.db.init_db', fake_init_db)
    result = runner.invoke(args=['init-db'])
    assert 'Initialized' in result.output
assert Recorder.calledこのテストは、init_db関数を呼び出されたか、関数でチェックするため、Pytestのmonkeypatchfixtureを使います。先に記したrunnerfixtureは、init-dbコマンドを名前で呼び出すために使われます。
9-4. 認証
たいていのページで、ユーザはログインしている必要があります。テストでこれを表現する最も簡単な方法は、clientを使ってloginview関数にPOSTリクエストを送ることです。毎回これを書き出す代わりに、この処理を行うクラスを記述し、テストごとにclientにそれを送るfixtureを使用します。
# tests/conftest.py

# ログイン処理を行うためのクラス
class AuthActions(object):
    def __init__(self, client):
        self._client = client

    def login(self, username='test', password='test'):
        return self._client.post(
            '/auth/login',
            data={'username': username, 'password': password}
        )

    def logout(self):
        return self._client.get('/auth/logout')


@pytest.fixture
def auth(client):                         # auth fixture
return AuthActions(client)authfixtureを使うことで、テストユーザとしてログインするテストでauth.login()を呼び出すことができます。これは、appfixtureの中でテストデータの一部として挿入されています。
registerview関数は、GETの読み取りに成功する必要があります。有効なフォームデータを持ったPOSTでは、ログインURLにリダイレクトされ、ユーザデータがデータベース内に格納されます。無効なデータではエラーメッセージが表示されます。
# tests/test_auth.py

import pytest
from flask import g, session
from flaskr.db import get_db


def test_register(client, app):
    assert client.get('/auth/register').status_code == 200                # GETリクエストを行う
    response = client.post(                                               # POSTリクエストを行う
        '/auth/register', data={'username': 'a', 'password': 'a'}
    )
    assert 'http://localhost/auth/login' == response.headers['Location'] # Locationヘッダー

    with app.app_context():
        assert get_db().execute(
            "select * from user where username = 'a'",
        ).fetchone() is not None


@pytest.mark.parametrize(('username', 'password', 'message'), (           # 複数の引数でテストを行う
    ('', '', b'Username is required.'),
    ('a', '', b'Password is required.'),
    ('test', 'test', b'already registered'),
))
def test_register_validate_input(client, username, password, message):
    response = client.post(
        '/auth/register',
        data={'username': username, 'password': password}
    )
assert message in response.dataclient.get()は、GETリクエストし、Flaskで返されるレスポンスオブジェクトを返します。client.post()は、POSTリクエストを送り、辞書型のデータをフォームデータに変えます。
ページの読み取りが成功するかテストするために、シンプルなリクエストが送られ、status_code属性が200 OKかチェックされます。レンダリングが失敗した場合、Flaskは500 Internal Server Errorコードを返します。
registerview関数がloginページにリダイレクト処理すると、headersにはログインURLを持ったLocationヘッダーが格納されます。
dataには、バイト型のレスポンスボディが含まれます。特定の値がページに表示されることが期待される場合、そのデータがdataの中にあるか確認します。byte型に対してはbyte型で比較します。ユニコードテキストを比較したい場合、get_data(as_test=True)を代わりに使います。
pytest.mark.parametrizeは、ある関数を異なる引数のもとでテストできるようにします。ここでは、同じコードを3度書くことなく、無効なインプットとエラーメッセージをテストする異なる値をテストするために使用されます。
loginview関数のテストは、registerview関数のテストと類似しています。データベースでデータをテストするよりも、ログイン後のsessionにuser_idを設定する方法が推奨されます。
# tests/test_auth.py

def test_login(client, auth):
    assert client.get('/auth/login').status_code == 200
    response = auth.login()
    assert response.headers['Location'] == 'http://localhost/'

    with client:                                                   # コンテキスト変数のテスト
        client.get('/')
        assert session['user_id'] == 1
        assert g.user['username'] == 'test'


@pytest.mark.parametrize(('username', 'password', 'message'), (
    ('a', 'test', b'Incorrect username.'),
    ('test', 'a', b'Incorrect password.'),
))
def test_login_validate_input(auth, username, password, message):
    response = auth.login(username, password)
assert message in response.datawithブロックの中でclientを使うことで、レスポンスが返された後のsessionのようなコンテキスト変数をテストすることができます。たいてい、リクエスト外からsessionにアクセスすると、エラーが発生します。
logoutview関数のテストは、loginview関数とは逆になります。ログアウト後にsessionはuser_idを保持していてはなりません。
# tests/test_auth.py

def test_logout(client, auth):
    auth.login()

    with client:
        auth.logout()
        assert 'user_id' not in session
9-5. ブログ
ブログview関数全てにおいて、先に記述したauthfixtureを利用する。auth.login()を呼び出し、それに続くclientからのリクエストはtestユーザとしてログインしている状態となります。
indexview関数は、テストデータで加えられた投稿に関する情報を表示します。記事の投稿者としてログインしていると、投稿を編集するためのリンクが存在しなければなりません。
indexview関数をテストしながら、他の認証の振る舞いをテストすることもできます。ログインしていない場合であれば、それぞれのページはログイン、またはregisterページへのリンクを示します。ログインしている場合、そのリンクは消えます。
# tests/test_blog.py

import pytest
from flaskr.db import get_db


def test_index(client, auth):
    #ログインしていない場合のテスト
    response = client.get('/')
    assert b"Log In" in response.data
    assert b"Register" in response.data

    #ログインしている時のテスト
    auth.login()
    response = client.get('/')
    assert b'Log Out' in response.data
    assert b'test title' in response.data
    assert b'by test on 2018-01-01' in response.data
    assert b'test\nbody' in response.data
assert b'href="/1/update"' in response.dataユーザは、create,update,deleteview関数にアクセスするために、ログインしている必要があります。ログインユーザは、update,deleteにアクセスするためにその記事の投稿者である必要があります。そうでない場合403 Forbiddenステータスが返されます。特定のidをもつ投稿が存在しない場合、updateとdeleteは404 Not Foundを返します。
#tests/test_blog.py

@pytest.mark.parametrize('path', (
    '/create',
    '/1/update',
    '/1/delete',
))
def test_login_required(client, path):
    response = client.post(path)
    assert response.headers['Location'] == 'http://localhost/auth/login'


def test_author_required(app, client, auth):
    # change the post author to another user
    with app.app_context():
        db = get_db()
        db.execute('UPDATE post SET author_id = 2 WHERE id = 1')
        db.commit()

    auth.login()
    # current user can't modify other user's post
    assert client.post('/1/update').status_code == 403
    assert client.post('/1/delete').status_code == 403
    # current user doesn't see edit link
    assert b'href="/1/update"' not in client.get('/').data


@pytest.mark.parametrize('path', (
    '/2/update',
    '/2/delete',
))
def test_exists_required(client, auth, path):
    auth.login()
assert client.post(path).status_code == 404createとupdateview関数は、GETリクエストを読み込み200 OKを返します。有効なデータがPOSTリクエストで送られた場合、createは新しい投稿データをデータベースに挿入し、updateは既存のデータを変更します。どちらのview関数とも、無効なデータの場合エラーメッセージを表示します。
# tests/test_blog.py

def test_create(client, auth, app):
    auth.login()
    assert client.get('/create').status_code == 200
    client.post('/create', data={'title': 'created', 'body': ''})

    with app.app_context():
        db = get_db()
        count = db.execute('SELECT COUNT(id) FROM post').fetchone()[0]
        assert count == 2


def test_update(client, auth, app):
    auth.login()
    assert client.get('/1/update').status_code == 200
    client.post('/1/update', data={'title': 'updated', 'body': ''})

    with app.app_context():
        db = get_db()
        post = db.execute('SELECT * FROM post WHERE id = 1').fetchone()
        assert post['title'] == 'updated'


@pytest.mark.parametrize('path', (
    '/create',
    '/1/update',
))
def test_create_update_validate(client, auth, path):
    auth.login()
    response = client.post(path, data={'title': '', 'body': ''})
assert b'Title is required.' in response.datadeleteview関数は、indexのURLにリダイレクトし、その投稿はデータベース内から削除されます。
# tests/test_blog.py

def test_delete(client, auth, app):
    auth.login()
    response = client.post('/1/delete')
    assert response.headers['Location'] == 'http://localhost/'

    with app.app_context():
        db = get_db()
        post = db.execute('SELECT * FROM post WHERE id = 1').fetchone()
        assert post is None
9-6. テストを実行する
必ずしも必要ではありませんが、冗長でない範囲でテストを実行するため、追加の設定をプロジェクトのsetup.cfgファイルに加えます。
# setup.cfg

[tool:pytest]
testpaths = tests

[coverage:run]
branch = True
source = flaskrテストを実行するにはpytestコマンドを使います。これはテスト関数全てを探し出し、実行します。
(env)flask-tutorial$ pytest

========================= test session starts ==========================
platform linux -- Python 3.6.4, pytest-3.5.0, py-1.5.3, pluggy-0.6.0
rootdir: /home/user/Projects/flask-tutorial, inifile: setup.cfg
collected 23 items

tests/test_auth.py ........                                      [ 34%]
tests/test_blog.py ............                                  [ 86%]
tests/test_db.py ..                                              [ 95%]
tests/test_factory.py ..                                         [100%]

====================== 24 passed in 0.64 seconds =======================テストのどれかが失敗した場合、pytestは生じたエラーを表示します。ドット表記でなく、それぞれのテスト関数のリストを取得したい場合はpytest -vを使用します。
テストのコード範囲を測るためには、直接実行する代わりにpytestを実行するcoverageコマンドを使います。
(env)flask-tutorial$ coverage run -m pytestターミナルでシンプルなcoverageレポートを見ることができます。
(env)flask-tutorial$ coverage report
Name Stmts Miss Branch BrPart Cover
------------------------------------------------------
flaskr/__init__.py 21 0 2 0 100%
flaskr/auth.py 54 0 22 0 100%
flaskr/blog.py 54 0 16 0 100%
flaskr/db.py 24 0 4 0 100%
------------------------------------------------------
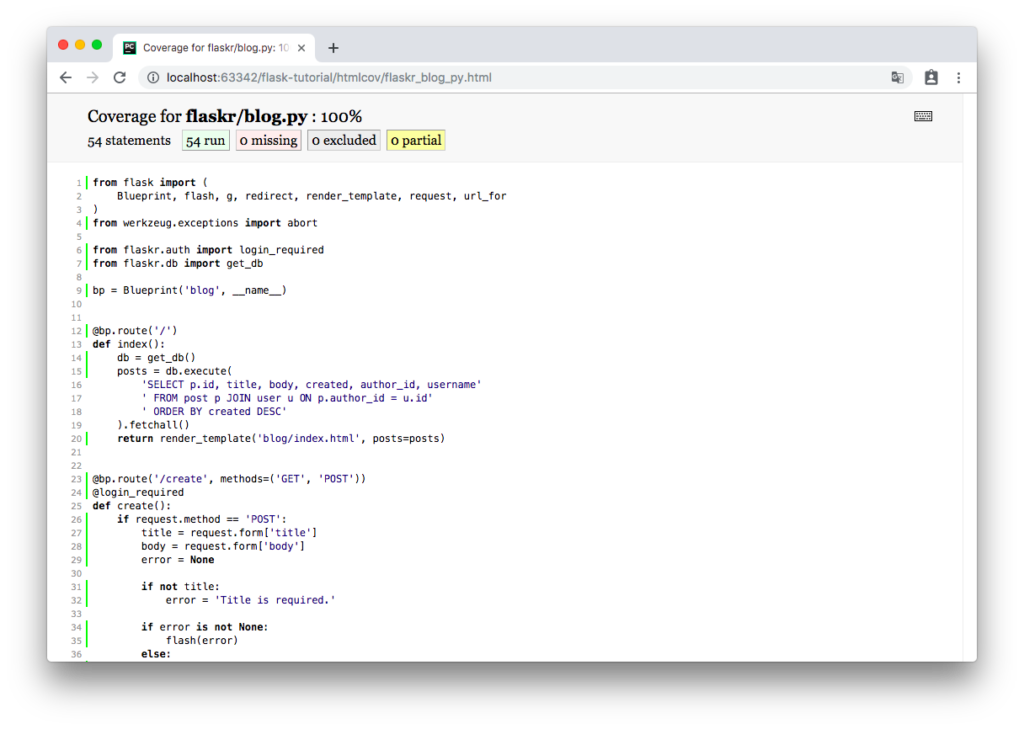
TOTAL 153 0 44 0 100%HTMLレポートでは、それぞれのファイルでどのラインがカバーされているか確認できます。
(env)flask-tutorial$ coverage htmlこれは、htmlcovディレクトリとファイルを生成します。ブラウザでhtmlcov/index.htmlを開くとリポートを見ることができます。
・hmtlcov/index.html
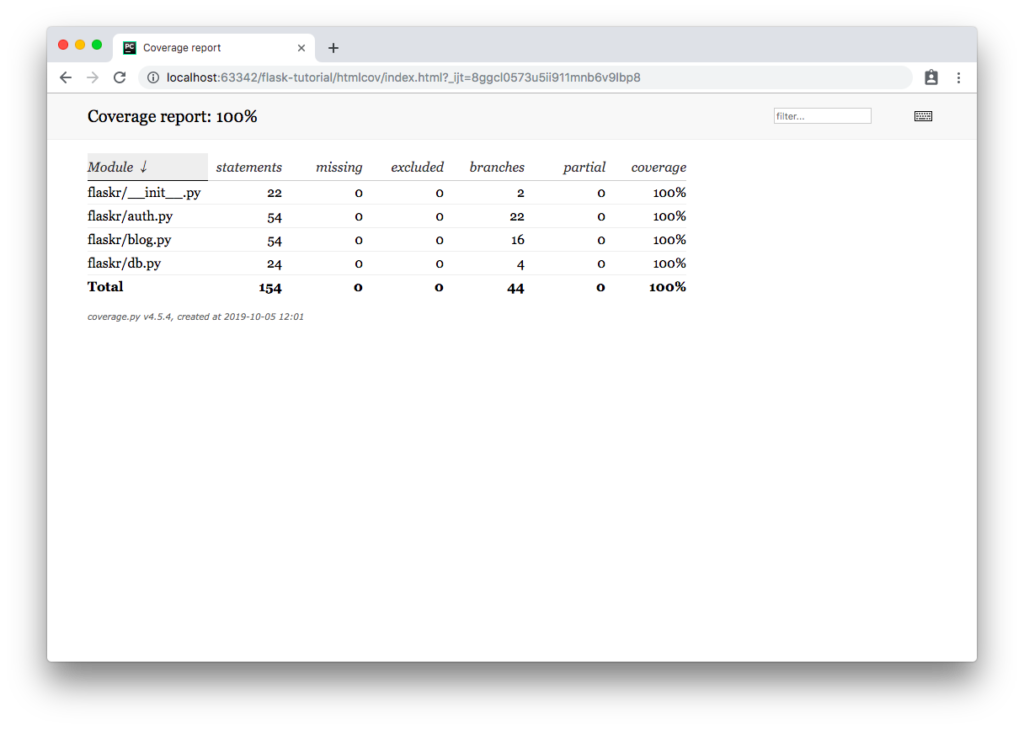
・htmlcov/flaskr_blog_py.html @@@tutorial15.png画像